Download nei for version 1.7 10.
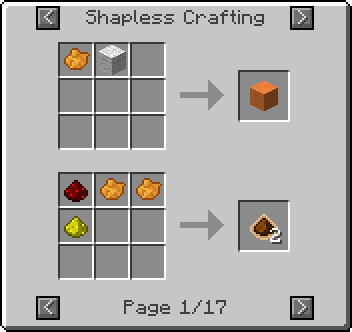
Not Enough Items is one of the most useful mods out there for minecraft. It will be useful to everyone - from ordinary players to server managers. This mod has a built-in mode for displaying the recipes of all the blocks that are present in your game. If you often put mods, then it is useful to know which recipes have been added. After all, remembering them by heart is almost impossible. All recipes will be at hand, you do not have to go to the Internet to search.

Moreover, not only recipes for various crafting are collected, but also recipes for potions. All recipes can be viewed in a convenient window without leaving the game. If the standard set of recipes can still be remembered, then recipes from mods are already difficult. Each mod has its own set of recipes, and it's easy to get lost in them.

For example, you installed some cool mod. And he adds a few dozen recipes. Can you remember them all? That's why it's worth downloading Not Enough Items.

And you can enchant any item in a couple of clicks. Just imagine how much easier your gameplay will be. Not Enough Items is a must for every gamer. You just need to download the Not Enough Items mod.

The main functionality can be divided into two types. The R key calls up the recipe window, and the U key brings up the menu for using a particular item in recipes. Understanding the management of the mod is not at all difficult. The interface is as convenient and friendly as possible.

The main advantages of the mod:
Convenient crafting of any blocks.
Fast item enchantment.
All recipes are always at hand.
Support for recipes from any mods.
Quick search by name.
Multiplayer support.
There are 2 functions in the recipe overview: Recipes and Application. Pressing the recipe ("R" default) or application ("U" default) button while hovering over an object will open the respective display mode. In the recipe window itself, left-clicking on an ingredient will open its recipe window, and right-clicking it will open the application window. The back button ("BACKSPACE" by default) will display the previous recipe, and the Esc or inventory key will close the window.
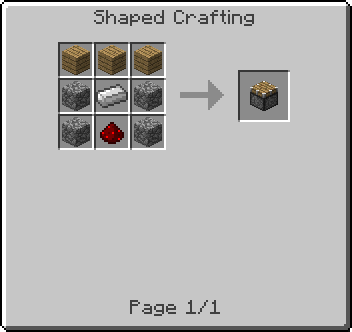
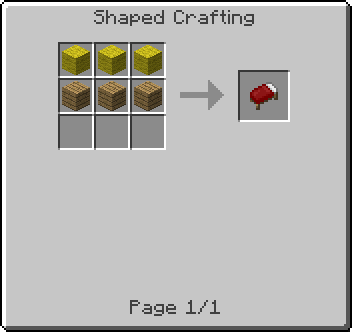
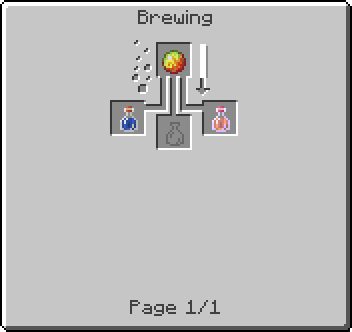
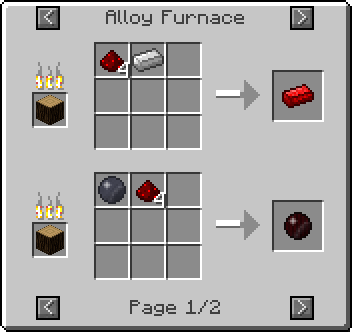
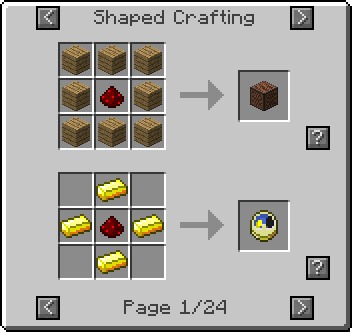
The recipe overview displays all the possible ways to craft an object, whether crafting at a workbench, in a furnace, in a brewing rack, or with any added crafting method (for example, a smelting furnace in the RP2 mod).

Unlike the Craft Guide, if different types of the same item can be used in a recipe (for example, wool of different colors or different types of wood), all subtypes will be displayed in a circle in the ingredient cell. So, for example, wool will change colors.


Cast mode displays all recipes that use the selected item.

The mode also displays recipes that do not necessarily have the exact location of the ingredients.

Button "?" will appear if the recipe type matches the mechanism you have unlocked. For example, when using a workbench, an accurate crafting recipe is displayed.

Clicking this button will return you to the crafting mode, where you will see which object each object should be placed in.
Hidden Object Window:
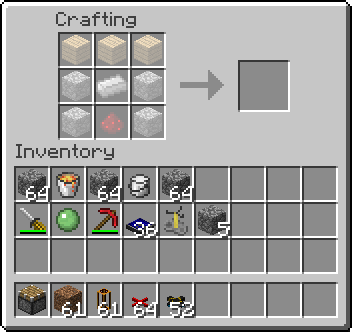
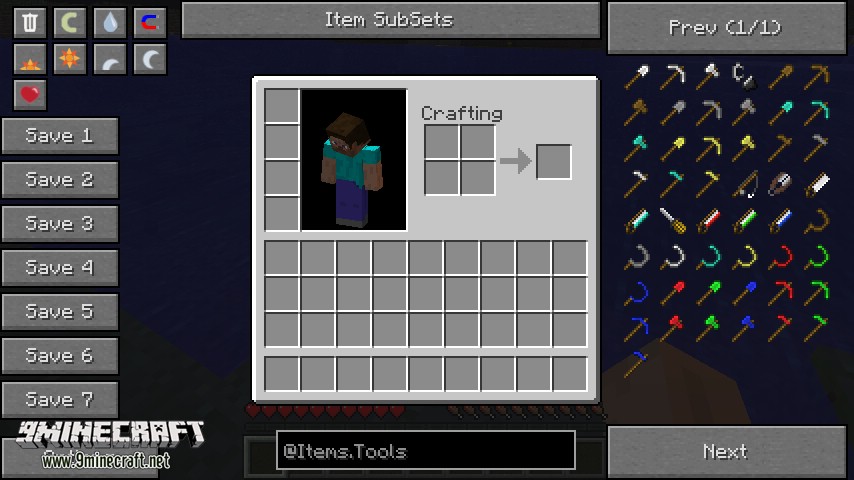
The search box is a black rectangle at the bottom of the screen. The items panel will display only those objects whose name contains the text entered in the search box. To enter text, you need to click on the rectangle. Right-clicking will instantly clear the search box. Keyboard case does not matter. Each search text is stored in memory and loaded again when the game is restarted.

The search box supports the metacharacters * (any character string) and ? (any single character), as well as complex java.regex matching patterns. As an example, "Bl?ck" will display items that have both "Black" and "Block" in their name. Whereas "^Block" will display items that start with the word "block" such as "Block Breaker" and "block$" will display items that end in "block" such as "noteblock" or "diamond block" .

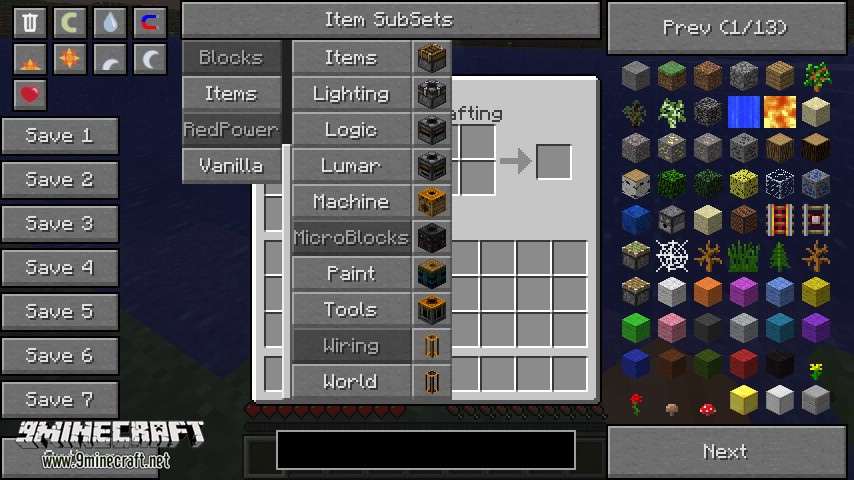
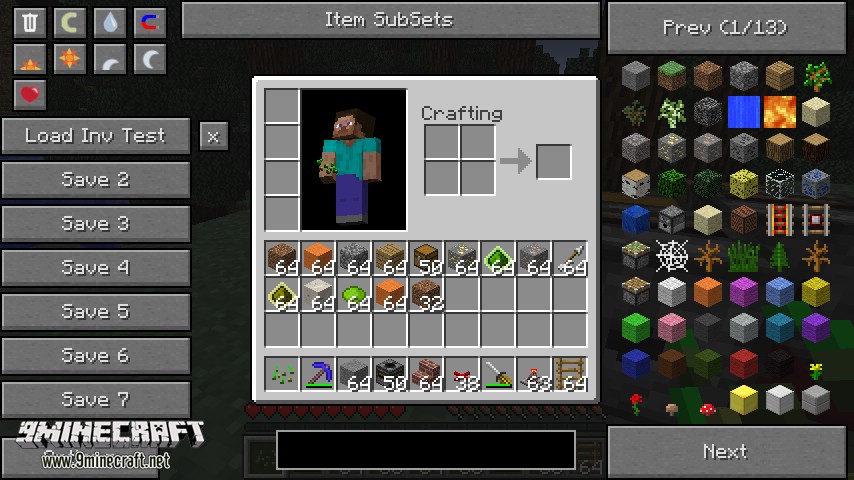
Item categories:
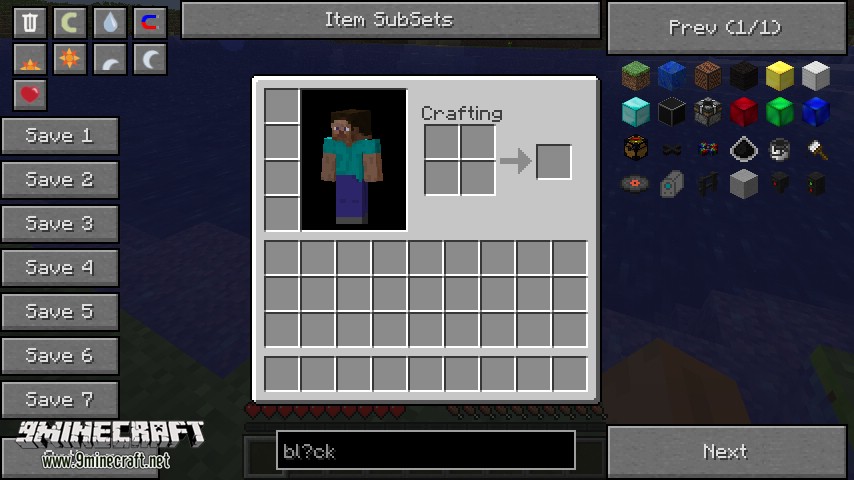
The Item Subsets button opens a drop-down menu that displays many different groups of items. Clicking on a group will display all the objects it contains, while right-clicking will hide them. Double clicking will display only the objects in the selected group.

Mods can use the API to create their own category tags.

Clicking on a group while holding down the Shift key will result in typing "@group_name" in the search box, thereby displaying only objects from that group in the item panel.

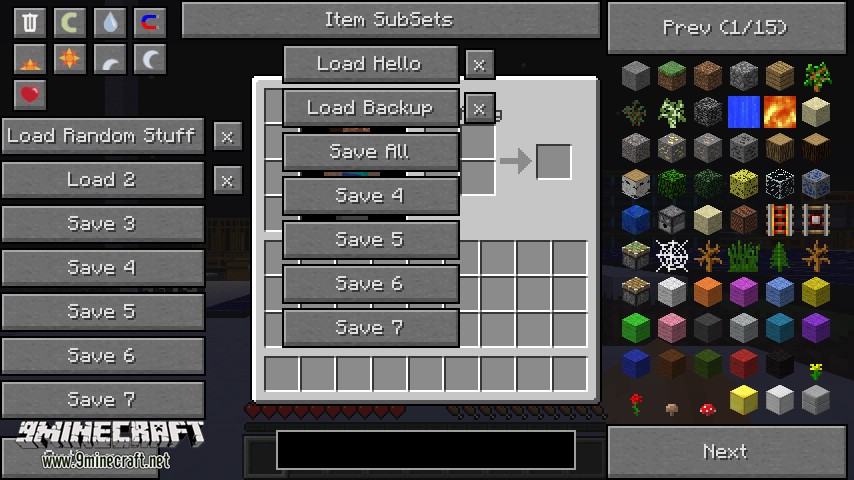
Double clicking on the Item Subsets button will display the category save buttons. The usual functions of saving, loading, renaming, deleting are available here, but they act on displayed or hidden items.

You can also create your own groups using the configuration file located in ".minecraftconfigNEISubsSet".
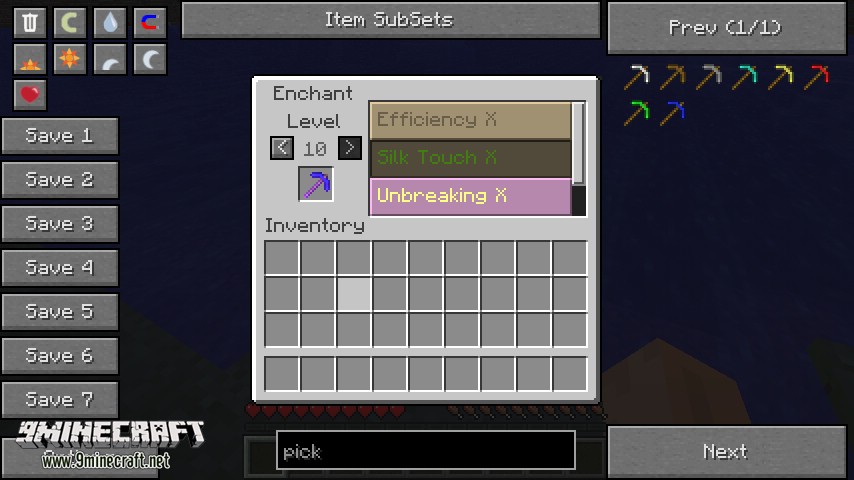
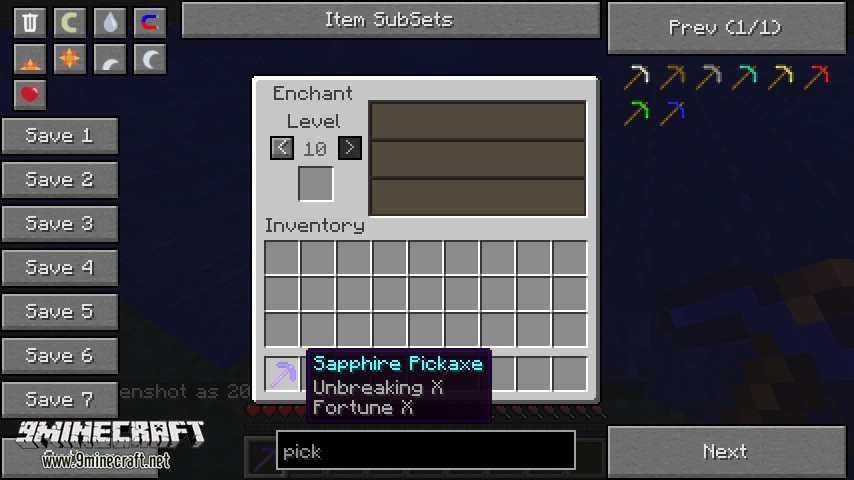
Enchant window:
By pressing the enchant key ("X" by default), you will open the enchant window interface. Here you can add an item to and select an available enchantment for it and its level. The level can be raised to a maximum of X (10). Clicking on an enchantment turns it on and off. (To eliminate unpleasant bugs) There are conflicting rules for different enchantments, so you cannot add, for example, Luck and Silk Touch to one item. Unfortunately, due to limited space, some names may be shortened. For example, Protection will be abbreviated to Protect if set to level 8, since "VIII" takes up a lot of space.


Basket:
The shopping cart button has 4 uses. All methods are available both in the personal inventory and in any other (for example, when opening a chest).
- Click the button while holding an item - the item will be deleted.
- Holding down SHIFT will delete all items of that type in your inventory.
- Click the button without holding the item, but holding SHIFT and clear your inventory completely.
- A simple click on the button will launch Trash Mode.
When the mode is running, every item you click on will be deleted. By holding SHIFT while doing this, you will delete all items of this type.
Creative mode:
Clicking the C button will launch creative mode. Everything is obvious here. Pressing the button simply changes the mode from creative to survival and vice versa. Please note that only your game mode will change on the SMP server, not the entire server.
Rain:
Here, too, everything is clear. If it's raining, the button will be available. Clicking on it will stop the rain.
Magnetism:
The last of the switches. If magnetism is on, all nearby objects will fly towards you. Although it won't work if the inventory is full.

Useful buttons:
4 buttons with the image of the sun and the moon are responsible for changing the time of day. Pressing them will change the time to Dawn, Noon, Sunset or Midnight. Time changes only in the direction of the future, so as not to disturb the work of time-dependent mechanisms. So pressing the Noon button multiple times will skip a few days.
The button with the image of the heart will increase the health and hunger of the player, as well as get rid of burning.
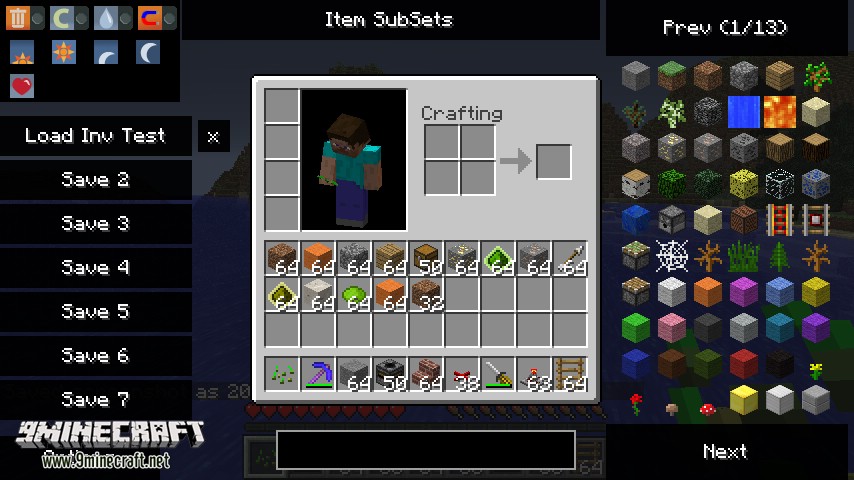
Save slots:
There are 7 save slots that allow you to save all of your inventory and armor. Right-clicking will rename the slot. An “x” button appears next to the recorded slot, clicking on it will clear the slot. Save slots are global and can be used across different worlds and servers.

Options menu:
This is a standard settings menu made in Minecraft design. Various settings are available in it, including setting hotkeys.


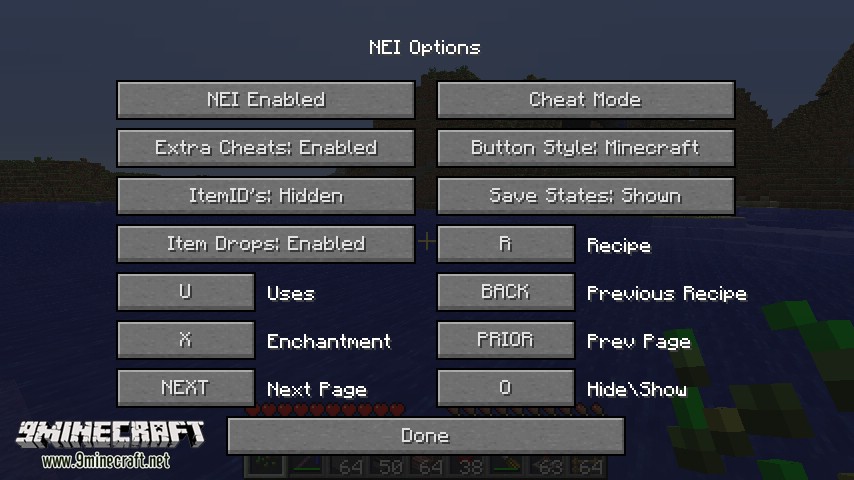
First button is responsible for enabling and disabling NEI. If the mod is disabled, only the options menu will be available to you. The switches in SMP and SSP mode are independent of each other.
Button cheat mode toggles between Cheat Mode and Recipe Mode. Recipe mode is for fair play and only displays recipes. Save slots and switches are not available in it, and the item panel does not allow you to add an item to your inventory.
Extra Cheats determines whether the Create, Rain, Magnet, Time and Heal buttons will be available.
Button Style toggles the button display between the default Minecraft style and the old style of the Too Many Items mod (shown below).

Item IDs toggles displaying item ID numbers on and off. This setting will work on all items in your inventory and in the item panel.
This button has three modes: Shown (display), Auto and Hidden (hide). Auto will only display item IDs if the NEI mod itself is enabled.
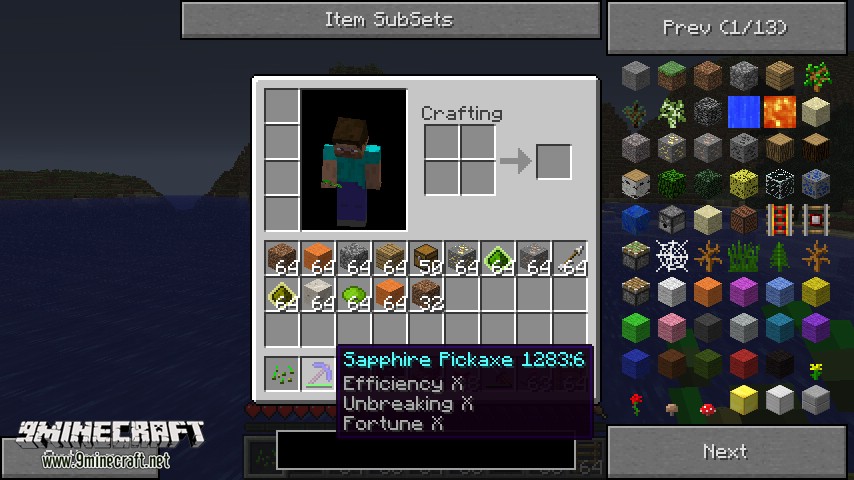
This setting has the additional function of displaying the exact damage of an item. For example, the sapphire pickaxe in the picture below has taken 6 points of damage.

save states simply determines whether save slots will be displayed or not.
If Item drops is disabled, all dropped items will be removed. So the item that is mined or thrown out of the inventory automatically disappears. This setting was added to get rid of lags.
Hotkeys work as usual. Click on them and press the key you want to set.
Mob spawners:
NEI makes all types of spawners available in your inventory and for placement in the game. All mobs added with mods also have a spawner available. The inventory spawner displays its contents in the same way as blocks. Hostile mobs are displayed in red, and passive ones in blue. A bug in multiplayer where all spawners were displayed with pigs inside has been fixed. Any user with NEI set (even if they are not an admin) on a server with NEI will display spawners correctly.

Useful features:
Ctrl-clicking an item in the inventory or item panel will increase the item's quantity. If you pick up an item and put it in a container while holding shift, the container will contain all the items of that type from your inventory. Useful for moving all existing cobblestone to a chest.
SMP:
Everything that can be done in single player mode is also available in multiplayer if NEI is installed on the server. If the mod is not installed on the server, you can still add items to your inventory using the give command as an admin. Most features are only available to admins.
Configuration file:
Many NEI settings are available in the "configNEI.cfg" file. But most of them can be changed in the mod's options menu.
Server configurations:
A configuration file "configNEIServer.cfg" will be created along with the server, containing various server settings. The comments in the file explain the available functions. In short, with the help of a file, you can endow a certain player with certain functions. So, for example, you can decide who should use admin-only enchantments, etc. There is also a section of prohibited blocks - these blocks will not appear in the user's items panel. By default, admin is disabled, so it is not available to players (unless you add their name to the exceptions).
Extended API:
NEI has an extended API built in, which allows you to correctly integrate other mods. This is demonstrated with the RedPower module, which adds smelter recipes and special item categories.
Of course, there are plenty of other crafting options too, such as the BTW anvil, a bunch of stuff in IC2, etc. However, only the smelting furnace from the RedPower mod is used in the mod. However, the author of NEI suggests that modders create small modules like RedPower.
The source code should help modders navigate. NEI uses a configuration loading system like ModLoader. Just refer to your configuration class NEI****Config.class and package IConfigureNEI with your mods. Any reference to the NEI must be through this class or subclasses. Your mod should not directly call NEI functions or classes, as this would make the mod dependent on the NEI to function. Just add a config file and classes to your mod and it will work with NEI installed.
» » Not Enough Items 1.12.2/1.11.2 (Too Many Items, Recipe Book, NEI)
Not Enough Items 1.12.2/1.11.2 (Too Many Items, Recipe Book, NEI)
Not Enough Items 1.12.2/1.11.2 (NEI) is a successor to both and Recipe Book. It arose around the same time as Craft Guide when Alexandria and a few others on the IRC suggested that I merge both and Recipe Book to remove their greatest flaws, ironically too many items, or in the case of recipe book, too many recipes. was great, but the one thing it lacked was an easy way to search and sort your items. When you had a mod like Red Power coming along with 10000 items both TMI and Recipe Book were racking up the pages. Even if you don't want to use NEI for cheating in items, you will likely feel right at home with the Recipe component of the mod.
This is a useful mod added to Tekkit that lists all the items in the game and their recipes, and provides the ability to spawn those items in.
Features:
Screenshots and Crafting Recipes:
recipe view:
Recipe view contains 2 functions, Recipes and Usage. Pressing the recipe key (default R) or usage key (default U) while hovering over any item will take you into this mode. Once in recipe view clicking will bring up recipes and right clicking will show usages. The back recipe key (default BACKSPACE) can be used to go back to the last recipe and the Esc or Inventory key is used to exit.
Recipe view shows you all the ways to craft that item, be it with a Crafting Bench, Furnace, Brewing Stand or another custom crafting inventory (Eg Alloy Furnace from RP2).

Unlike Craft Guide when a recipe can be made using multiple types of the same item (Eg the different colors of wool or the different types of wood), the ingredients will cycle through the available subtypes. So the wool will change colour.
Usage mode shows you all the recipes that contain that Item.

And it shows shapeless recipes too.
The? button will appear when the type of recipe matches the container you currently have opened. Eg. If you show shaped recipes while using a workbench.
Clicking on this button will return you to the main inventory wher you will see highlighted overlays in the slots prompting you of which items to put where.
Item Search Box
The Item Search Box is the black bordered rectangle at the bottom. Only items that contain the text in the Item Search field will be shown in the Item Pane. The search box must be clicked on to start typing. Right clicking on the search box will clear it instantly. It is not case sensitive. Any search terms will be saved and loaded when you restart minecraft.

The search box also supports wildcards * (any string of characters) and ? (any one character) as well as the complicated java.regex pattern matcher. As an example Bl?ck shows names containing Black and Block. Also ^Block would show items starting with block such as Block Breaker and block$ would show items ending with block such as noteblock or diamond block.
Item Subsets
The Item Subsets button is a dropdown menu containing many different grouped sets of items. Clicking on a set will show all the items it contains and right clicking will hide them all. Double clicking on a set will show only the items in that set.

Mods can use the API to generate their own tag sets.
Shift clicking on a set will type @setname into the search bar which will make the Item Pane show only items in that set.
If you rightclick on the Item Subsets button the buttons for saving subsets will appear. These function identically to the normal save states, renaming, save/load/delete, but they will save and load the items you have hidden and shown.
You can also add your own sets using the config file located in “.minecraft/config/NEISubsSet”
Enchantment Selector
By pressing the enchantment key (default X) you can bring up the enchantment selector gui. It allows you to put an item in the slot and select the enchantments and level that could be applied from an enchantment table. The level can go up to a maximum of X. Clicking on an enchantment toggles it on and off. (To prevent unnice bugs) The normal multiple enchantment conflict rules apply so you can't have fortune and silk touch together etc. Unfortunately due to space limitations some names have had to be shortened, Projectile to Proj, Protection to Protect, Bane of Arthropods to Arthropods. Enchantment names will only be shortened if there is not enough space. Eg Protection will be shortened to Protect if you set level 8 because VIII takes up a bit of space.
The trash can button functions in 4 ways. All operations apply both to your personal inventory and any inventory you may have opened (Eg a chest).
- 1. Click on it while holding an item it will delete the item you are holding.
- 2. Hold SHIFT while clicking on it with an item in your hand and it will delete all the items of that type in your inventory.
- 3. Hold SHIFT while clicking on it will clear your inventory.
- 4. Just clicking normally will toggle Trash Mode
Trash Mode
When trash mode is enabled any item you click on will be deleted. Holding SHIFT and clicking on any item will delete all items of that type.
creative mode
Clicking on the C button will toggle creative mode. This is self-explanatory. Simply change from creative to survival and back again. Note that on SMP servers this will change only you into creative mode and not the entire server.
Again another self-explanatory button, if it's raining right now this button will be enabled activated. Clicking it will change the rain to on or off.
Magnet Mode
The last of the toggle buttons. When magnet mode is enabled any items within a reasonable distance will pick themselves up and fly towards you. Items wont be attracted if they can't fit in your inventory though.

Utility Buttons
The 4 buttons with the sun and moon are time set buttons. They will set the time to Dawn, Noon, Dusk and Midnight when clicked. These will only advance time forward to not break machines relying on world time. So if you click the day button multiple times it will keep advancing the days.
The heart button will heal the player, fill the hunger bar and stop them burning if on fire.
Save States
There are 7 save states capable of saving your entire inventory and armor to disk. Right clicking on a state will let you rename it. The x Button appears next to loaded states will clear them. Save states are a global feature that can be transferred between worlds and even servers.
Options Menu
This is just the regular MC Style options configuration. It allows you to edit various settings and especially Key Bindings.
The first Button Toggles wether NEI is Enabled or not. If it's not enabled you wont be able to see anything except the options Button. The enabled state is separated for SMP and SSP.
The Cheat Mode button toggles between Cheat Mode and Recipe Mode. Recipe mode is for playing legit and just using the recipe book component. The save states and cheat buttons will disappear and the Item panel will not spawn items into your inventory.
Extra Cheats sets wether the Create, Rain, Magnet, Time and Heal buttons are to be shown.
Button Style switches between the default Minecraft Button Style obtained from your texture pack and the old school black box TMI style (showcased below)
Item IDs toggles whether to show the ID of the item in the tool tip. This will work for all items in your inventory as well as the panel.
This option will cycle between Shown, Auto and Hidden. Auto will show ID's only when NEI itself is shown and enabled.
This has the added use of showing you exactly how much damage a tool has sustainer. Eg the Sapphire Pickaxe below has taken 6 damage.
Save states merely sets weather or not to show the save states, self-explanitory.
If Item drops are disabled any EntityItems in the world will be deleted. So mining a block or dropping an item will give you nothing. Someone said they must have it for lag removal so I added it.
The KeyBindings all do what they say. Click on them and then press the key you want to change it to.
Mob Spawners
NEI makes all types of mob spawners obtainable in your inventory and place able. Any custom mobs you may have will also be assigned a spawner. The spawner item will show the entity inside of it just like the block. Hostile mobs will have Red names and Passive mobs Blue names. The bug in SMP where all mob spawners show pigs has also been fixed. Any users who have NEI installed (even if they are not Ops) on a server with NEI will be shown the correct mob.

Various Inv Tweaks
Ctrl clicking on any item in your inventory will give you more of it, just as if you clicked on it in the Item Pane. If you pick up an item and hold shift while placing it in a container then all items of that type you have in your inventory will also be put in alongside the placed item. Useful for transferring all your cobblestone to a chest in one go.
Everything that you can do in SSP can be done in SMP if the server has NEI installed. If not then NEI can still spawn items using the give command if you are an OP. Most of the features are only enabled for OPs.
There are many options in NEI that can be configured in "config/NEI.cfg". Note that most of these are editable in the options menu.
Server Config
A configuration file will be generated in config/NEIServer.cfg containing various confiutation options for servers. The config file comments explain the functions. In short it allows you to assign certain functions to be used only by certain players. So you can select who can use OP enchantments etc. There is also a banned blocks section, any blocks that are banned wont show in a user's item panel. Bedrock is banned by default so connected users can't spawn bedrock, (unless you specify their name).
Extended API
There is an extended API built in to NEI to allow mods to integrate properly. This is demonstrated with the RedPower module that provides Alloy Furnace recipes and RedPower specific subsets.
How to use:
- Click a question mark to show an overlay of the recipe on the open GUI.
- shift-click the question mark in a Crafting GUI, and NEI will auto-fill the GUI with the recipe using whatever items are in the inventory.
- Using F7(default) while in game will show yellow and red lines on the ground in areas where the light level is low enough that mobs can spawn at day or at any time (Yellow lines: Mobs can spawn at night, Red lines: Mobs can always spawn).
- The Mod subset includes subsets of all items sorted by ID.
- The Creative tabs subset has each creative mode tab in its own subset.
- In the NEI options menu, enable highlight tips to see the name of whatever block is in the crosshair (similar to Waila).
- right-click the output of a crafting grid to pick up as many of the result as available up to a stack.
- hold Q and click on an item in an inventory to drop a single item on the floor.
- Scroll up or down while hovering over an item in the inventory to effectively move one item per scroll notch to the hotbar or vice versa.
- hold Shift when placing an item into an inventory to move all items of the same type to that inventory.
- Under NEI options > NEIPlugins options > Tooltip options, enable or disable the fuel tooltips.
- Press Page up or down(bind-able) or use the scroll wheel to change page in the item panel, instead of clicking the Next and Previous buttons (this only works if the cursor is over the item panel).
- In any sort of crafting GUI (including machines), Click the arrow (progress bar) from the input to the output to view all the recipes used by that GUI.
- Press P when in the inventory to bring up a custom potion interface.
Not Enough Items this is not just a mod, but a whole collection of mods! Downloading NEI you will get a convenient search for items and their recipes, as well as be able to restore health, control the game mode and the weather. There are several modes of operation, the so-called cheating to give yourself items, change the weather, etc. and the recipe view mode, you can only view recipes. This modification is used in minecraft assemblies, as it shows recipes for things added by third-party mods. Also for Not Enough Items, addons are being created that expand the functionality.
Controls and functions of the mod Not Enough Items
- R- Show the recipe for the item you hovered over.
- U- Show recipes that use the item hovered over
- backspace- Previous Recipe
- X(in inventory) - Enchantment window
- P(in inventory) - Potion Brewing Window
- F7- Show places with insufficient lighting where monsters can spawn
- F9- Display chunk boundaries
- O- Click in inventory to disable NEI interface
How to enable Cheat Mode
- Open inventory ("E")
- Go to "Options" (lower left corner)
- And then in "Inventory" (first paragraph)
- Click the "Global" button in the upper right corner (the mode will change to "World / World")
- Switch "Recipe Mode" to "Cheat Mode"
- Next to "NEI Enable" press the "W" button
- Go back to the list of settings by clicking the "Back" button at the bottom
- Go to JEI Integration and click on JEI ItemPanel to change to NEI ItemPanel
- Press "Esc" to return to your inventory
If you did everything right, the interface will change and you will be able to give yourself items on click.
Review
How to install Not Enough Items?
- Install Minecraft Forge
- Press Win + R (the "Win" button is between "Ctrl" and "Alt")
- In the window that appears write %appdata%
- Go to .minecraft/mods (if there is no "mods" folder, create it)
- Drag the mod (.zip/.jar) into the mods folder
Maud NotEnoughItems is a massive addition to Minecraft that greatly simplifies crafting and other details of the game. It will be very useful if you play with a lot of other mods.
The main purpose of the Not Enough Items mod is to view crafting recipes and "cheat" adding any item to the inventory. Such actions are performed using a special panel that appears on the left side of the screen when opening the inventory. When installing any other mods for Minecraft, the items from them will also be displayed on the panel. You can use the search bar to find it quickly.
In addition to the standard actions with the inventory, the following functions will also be available to you:
- enchantment of objects;
- creating potions;
- change in time of day and weather conditions;
- switching from survival mode to creative and vice versa;
Instructions for installing the mod Not Enough Items
- Make sure you have .
- Download the mod for your version of the game.
- Throw it in the mods folder, which is located in the game folder.
Starting with Minecraft 1.7.10, you will also need to install